Quick Answer: Certificate Lifecycle Stages
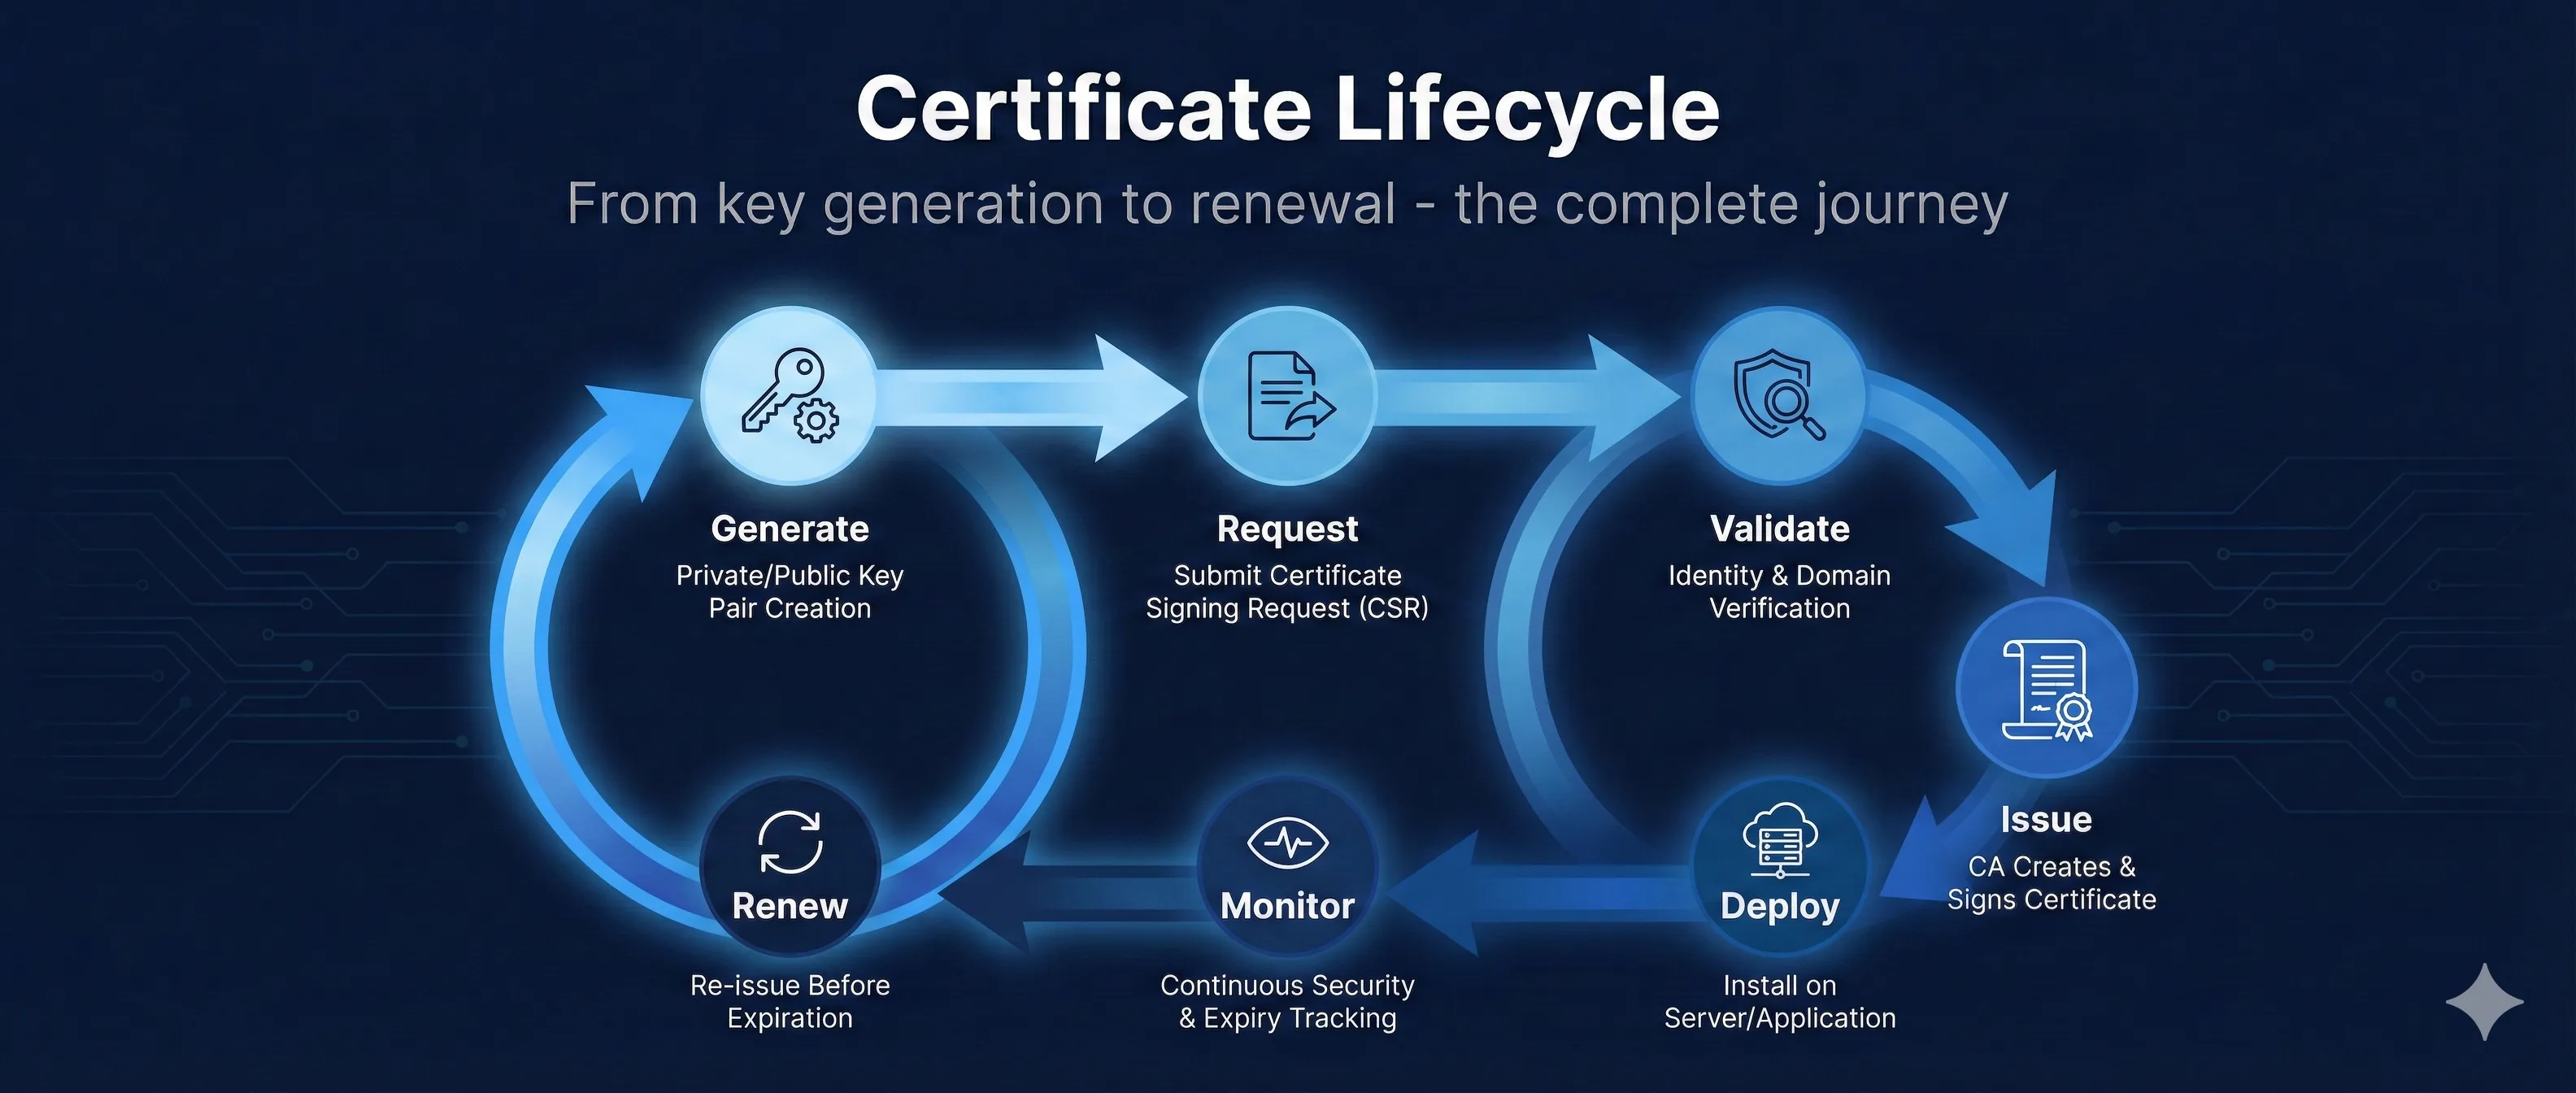
The certificate lifecycle consists of 7 key stages that every certificate goes through, from creation to renewal.
The most common cause of certificate-related outages is expired certificates. Automating monitoring and renewal prevents these costly incidents.
Certificate Lifecycle
7 stages from creation to renewal
One-time setup when issuing a new certificate
Ongoing monitoring and periodic renewal
Stage 1: Key Generation
Every certificate starts with a cryptographic key pair. The private key must be generated securely and protected throughout its lifecycle.
Key Generation Best Practices
- • Generate on-server: Never generate keys on a developer machine and transfer them
- • Use strong algorithms: RSA 2048+ or ECDSA P-256/P-384
- • Protect immediately: Set restrictive file permissions (chmod 600)
- • Consider HSMs: Hardware Security Modules for high-value keys
Generate an RSA Key Pair
# Generate 2048-bit RSA private key
openssl genrsa -out private.key 2048

# For stronger security, use 4096 bits
openssl genrsa -out private.key 4096

# Generate with passphrase protection
openssl genrsa -aes256 -out private.key 2048
Generate an ECDSA Key Pair
# Generate ECDSA P-256 key (recommended for most uses)
openssl ecparam -genkey -name prime256v1 -out private.key

# P-384 for higher security requirements
openssl ecparam -genkey -name secp384r1 -out private.key
RSA vs ECDSA
Stage 2: CSR Creation
A Certificate Signing Request (CSR) contains your public key and identity information. This is what you submit to the Certificate Authority.
CSR Fields
| Field | Abbreviation | Example |
|---|---|---|
| Common Name | CN | www.example.com |
| Organization | O | Example Inc. |
| Organizational Unit | OU | IT Department |
| City/Locality | L | San Francisco |
| State | ST | California |
| Country | C | US |
Generate a CSR
# Generate key and CSR in one command
openssl req -new -newkey rsa:2048 -nodes \
  -keyout private.key -out request.csr \
  -subj "/CN=www.example.com/O=Example Inc/C=US"

# Generate CSR from existing key
openssl req -new -key private.key -out request.csr

# Generate CSR with SANs (Subject Alternative Names)
openssl req -new -key private.key -out request.csr \
  -config <(cat <<EOF
[req]
distinguished_name = req_distinguished_name
req_extensions = v3_req
[req_distinguished_name]
CN = www.example.com
[v3_req]
subjectAltName = @alt_names
[alt_names]
DNS.1 = www.example.com
DNS.2 = example.com
DNS.3 = api.example.com
EOF
)
Verify Your CSR
# View CSR contents
openssl req -in request.csr -noout -text

# Verify CSR signature
openssl req -in request.csr -noout -verify
Stage 3: Validation Process
Before issuing a certificate, the CA must validate that you control the domain and (for OV/EV) verify your organization's identity.
Domain Validation (DV) Methods
HTTP-01 Challenge
Place a specific file at a well-known URL on your web server.
http://example.com/.well-known/acme-challenge/TOKENDNS-01 Challenge
Add a TXT record to your domain's DNS. Required for wildcard certificates.
_acme-challenge.example.com TXT "TOKEN"Email Validation (Being Phased Out)
CA sends email to admin@domain.com, administrator@domain.com, etc. You click a link to confirm control.
Note: WHOIS-based email DCV ended July 15, 2025. CA/Browser Forum ballot SC-090 proposes sunsetting ALL email-based DCV methods. Prefer DNS-01 or HTTP-01.
Organization Validation (OV)
- • Verify business registration documents
- • Phone callback to verified number
- • Takes 1-3 business days typically
Extended Validation (EV)
- • All OV checks plus additional verification
- • Verify legal existence and operational status
- • Verify physical address
- • Takes 1-2 weeks typically
CAA Records
Before issuing, CAs must check your CAA (Certification Authority Authorization) DNS record. This specifies which CAs are allowed to issue certificates for your domain.
# Check CAA records
dig CAA example.com

# Example CAA record (allows Let's Encrypt)
example.com. CAA 0 issue "letsencrypt.org"
Stage 4: Certificate Issuance
Once validation passes, the CA signs your public key with their private key, creating your certificate.
What You Receive
Your Certificate (Leaf)
Contains your public key, domain name(s), validity period, and CA's signature.
server.crt, certificate.pemIntermediate Certificate(s)
The CA's certificate that signed yours. Required for chain validation.
intermediate.crt, chain.pem, ca-bundle.crtFull Chain (Combined)
Your certificate + intermediate(s) concatenated. Many servers need this.
fullchain.pemBuild the Full Chain
# Concatenate leaf + intermediate(s)
cat server.crt intermediate.crt > fullchain.pem

# Verify the chain
openssl verify -CAfile root.crt -untrusted intermediate.crt server.crt
Validity Periods
| Certificate Type | Maximum Validity |
|---|---|
| DV/OV/EV (Public) | 398 days (13 months) |
| Let's Encrypt | 90 days |
| Private/Internal CA | No limit (your policy) |
Stay Ahead of Policy Changes
Browser vendors are reducing certificate lifetimes. Track upcoming deadlines and countdown timers.
View PKI Compliance HubStage 5: Installation
Install your certificate and private key on your server. Configuration varies by platform.
Nginx Configuration
server {
    listen 443 ssl http2;
    server_name example.com;

    ssl_certificate /etc/nginx/ssl/fullchain.pem;
    ssl_certificate_key /etc/nginx/ssl/private.key;

    # Modern TLS configuration
    ssl_protocols TLSv1.2 TLSv1.3;
    ssl_ciphers ECDHE-ECDSA-AES128-GCM-SHA256:ECDHE-RSA-AES128-GCM-SHA256;
    ssl_prefer_server_ciphers off;

    # OCSP Stapling
    ssl_stapling on;
    ssl_stapling_verify on;
}
Apache Configuration
<VirtualHost *:443>
    ServerName example.com

    SSLEngine on
    SSLCertificateFile /etc/apache2/ssl/server.crt
    SSLCertificateKeyFile /etc/apache2/ssl/private.key
    SSLCertificateChainFile /etc/apache2/ssl/intermediate.crt

    SSLProtocol all -SSLv3 -TLSv1 -TLSv1.1
</VirtualHost>
Verify Installation
# Test with OpenSSL
openssl s_client -connect example.com:443 -servername example.com

# Check certificate details
echo | openssl s_client -connect example.com:443 2>/dev/null | \
  openssl x509 -noout -dates -subject

# Test with curl (verbose)
curl -v https://example.com 2>&1 | grep -A 6 "Server certificate"
Installation Checklist
- ✓ Private key file permissions set to 600 or 400
- ✓ Full chain includes intermediate certificate(s)
- ✓ Server restarted/reloaded after configuration
- ✓ Firewall allows port 443
- ✓ DNS points to the correct server
Stage 6: Monitoring & Alerting
Proactive monitoring prevents the most common cause of certificate outages: unexpected expiration.
What to Monitor
Expiration Date
Alert at 30 days, 14 days, 7 days, and 1 day before expiration.
Chain Validity
Verify the full chain is properly served and all certificates are valid.
Revocation Status
Check OCSP/CRL to ensure your certificate hasn't been revoked.
Certificate Transparency
Monitor CT logs for unauthorized certificates issued for your domains.
Command-Line Monitoring
# Check days until expiration
echo | openssl s_client -connect example.com:443 2>/dev/null | \
  openssl x509 -noout -enddate

# Calculate days remaining
EXPIRY=$(echo | openssl s_client -connect example.com:443 2>/dev/null | \
  openssl x509 -noout -enddate | cut -d= -f2)
EXPIRY_EPOCH=$(date -d "$EXPIRY" +%s)
NOW_EPOCH=$(date +%s)
DAYS_LEFT=$(( ($EXPIRY_EPOCH - $NOW_EPOCH) / 86400 ))
echo "Days until expiration: $DAYS_LEFT"

# Check if certificate will expire within 30 days
openssl s_client -connect example.com:443 2>/dev/null | \
  openssl x509 -noout -checkend 2592000 && \
  echo "OK" || echo "EXPIRING SOON!"
Monitoring Tools
| Tool | Type | Best For |
|---|---|---|
| Venafi | Enterprise | Full lifecycle management |
| cert-manager | Kubernetes | Cloud-native apps |
| Prometheus + Blackbox | Open Source | Self-hosted monitoring |
| Datadog/New Relic | SaaS | Full-stack observability |
Stage 7: Renewal
Renewal should happen well before expiration. The process repeats stages 1-5, though key reuse is sometimes possible.
Renewal Strategies
Reuse Existing Key
Generate new CSR with same private key. Faster but less secure—if key is compromised, all certificates are affected.
Generate New Key (Recommended)
Create fresh key pair each renewal. Better security, limits blast radius of potential compromise. Required by some policies.
When to Renew
- Let's Encrypt (90 days): Renew at 60 days (30 days before expiry)
- Commercial (1 year): Renew at 11 months (30 days before expiry)
- Always: Test in staging before production
Expired Certificate Impact
- • Users see security warnings and can't access your site
- • API integrations fail
- • Search rankings can be affected
- • Customer trust is damaged
- • Some high-profile outages have cost millions in revenue
Automation Tools & Best Practices
Automating the certificate lifecycle eliminates human error and prevents outages.
Certbot (Let's Encrypt)
# Initial certificate request
sudo certbot --nginx -d example.com -d www.example.com

# Test automatic renewal
sudo certbot renew --dry-run

# Set up cron for automatic renewal
# (Certbot usually adds this automatically)
0 0,12 * * * root certbot renew --quiet
cert-manager (Kubernetes)
# Install cert-manager
kubectl apply -f https://github.com/cert-manager/cert-manager/releases/download/v1.13.0/cert-manager.yaml

# Create ClusterIssuer for Let's Encrypt
apiVersion: cert-manager.io/v1
kind: ClusterIssuer
metadata:
  name: letsencrypt-prod
spec:
  acme:
    server: https://acme-v02.api.letsencrypt.org/directory
    email: admin@example.com
    privateKeySecretRef:
      name: letsencrypt-prod
    solvers:
    - http01:
        ingress:
          class: nginx
Automation Best Practices
- • Use ACME protocol: Standardized automation for certificate issuance
- • Test in staging: Let's Encrypt and others offer staging environments
- • Reload, don't restart: Use graceful reload to apply new certificates
- • Monitor renewal jobs: Alert if automation fails
- • Document everything: Record CA, validity periods, renewal process
- • Centralize management: Use a single platform for visibility
Related Resources
Certificate Anatomy
Understand X.509 certificate structure and fields.
ACME Protocol
Automate certificate issuance and renewal with ACME.
Certificate Revocation
Learn about CRL, OCSP, and revoking compromised certificates.
CSR Builder Guide
Create proper Certificate Signing Requests for issuance.
Certificate File Formats
Convert between PEM, DER, PFX, and other formats.
Frequently Asked Questions
Can I reuse my private key when renewing?
Technically yes, but generating a new key pair for each certificate is more secure. If your key is ever compromised, limiting its lifespan limits the damage.
Why are Let's Encrypt certificates only 90 days?
Short validity encourages automation and limits the impact of compromised keys. If everyone automates renewal, it's not a burden.
What happens if my certificate expires?
Browsers will show a security warning and most users won't proceed. APIs and integrations will fail with certificate errors. Your site is effectively down.
How do I handle certificates for multiple servers?
Use a centralized certificate management platform (Venafi, cert-manager, AWS Certificate Manager) that can distribute certificates to all servers automatically.
Should I use a wildcard certificate?
Wildcards (*.example.com) reduce management overhead but have a larger blast radius if compromised. They also require DNS-01 validation with Let's Encrypt.
What's the difference between PEM, DER, and PFX?
These are file formats. PEM is Base64-encoded (most common on Linux), DER is binary, and PFX/PKCS#12 bundles the certificate and private key (common on Windows).
Ready to Practice?
See the complete certificate lifecycle in action with our interactive demo.
Try the Interactive Demo